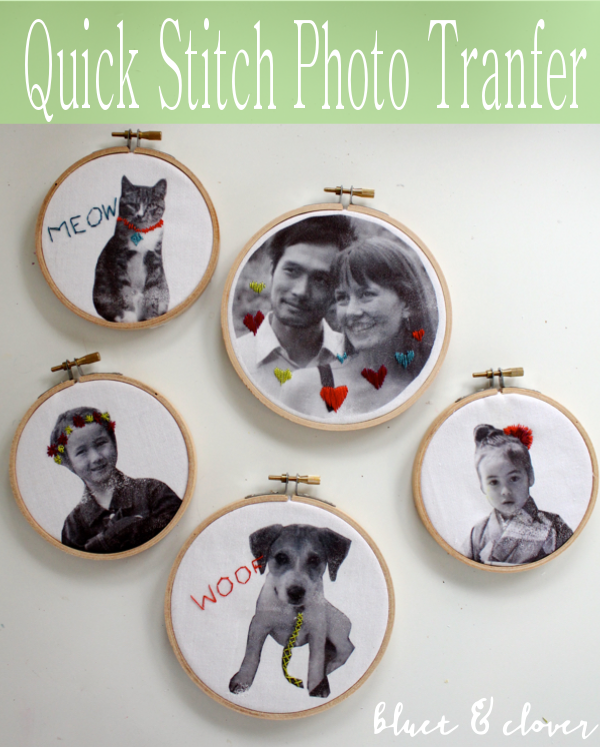
Quick Stitch Picture Hoops
It is one gray, chilly, windy day out there. The perfect setting for working indoors on a cozy craft.
I'm not exactly sure what to call this project. There's some stitching, some iron transferring and some embroidery hoop framing involved. I'm planning on hanging these for a cute alternative to the traditional framed family photos.
Supply and Tool List:
Iron transfer paper (for light fabrics)
White muslin fabric
Embroidery hoops
Embroidery floss in colors of your choice
Embroidery needle
Iron
Scissors
Scissors
Wood cutting board
Digital images
Computer
Printer
Directions:
If you want to paint the embroidery hoops, make sure you do that step first and let them dry completely.
If you want to paint the embroidery hoops, make sure you do that step first and let them dry completely.
Choose the images you want to transfer and size them to fit in your hoops. Be sure to flip the images horizontally before printing. Also, black and white images are best for this project because they really allow the colorful stitching to pop.
Follow the directions for printing and ironing with your iron transfer paper. Cut out the image and place it face down on the fabric. It's recommended that you iron on a wood cutting board and not an ironing board.
I silhouetted some of my images on the computer first, but you could also just cut out with scissors if computer graphics are not your thing.

When ironing the image onto the muslin, be sure to use firm pressure. The directions said to iron for 20 seconds, but I found that it was more like a minute of pressing down really hard on the back of the image with the tip of the iron. Could be that my iron is just not the best. I recommend taking a little peek at the image before you peel the whole piece of paper backing off. If you notice that there's still color on the backing, lay it back in place and iron some more. This is especially important around detailed areas like faces. Oh, and don't touch the paper until it's cooled a few seconds. Trust me, it's hot.
By the way, I tried this on aida fabric (the stuff you use for cross stitching) and it didn't work well at all. The texture of the fabric is just too rough to get a nice smooth transfer.

After you place the image centered in the hoop, it's time to get stitching.
Take 2 threads of floss and thread your needle. To separate the floss, run your index finger down the middle of the thread while holding the ends with your other hand (like I'm doing in the picture below). It's best not to cut more than 10 inches of floss as a time because it tends to get tangled while you stitch.

Leave an inch or so of a tail of floss behind your image. As you go, encase the tail with your stitches. That will secure the thread in place.

Here are some big X's which is your basic cross stitch. When you stitch on muslin versus aida, you won't be able to count the spaces as you go. Just go ahead and stitch where you please and vary the size of stitch to fit your picture.

I back stitched to make letters. To do this look at the next three pictures. Pull your needle up 1 stitch ahead of your previous stitch.

Then bring it back to meet the top of that previous stitch.

And that's how you make a back stitch. Very useful for doing these free form letters.

To knot thread, run your needle under a few stitches on the backside of the fabric. Bring the needle up and through the loop you've just made. Pull the thread to flatten the loop and repeat twice.
After you finish stitching your work of art, trim the excess fabric around the hoop. I did this before I started stitching, but muslin can be a little stretchy and you may want to re-frame the image after stitching to make sure that it's nice and tight. Use fray blocking glue on the raw edges of fabric. You can also use stitches to stop the fabric from fraying. To do this, remove the fabric from the frame and stitch along the outer crease of the circle.

Here's a closer look at some of the stitching I did. Anything goes. Have fun with it!
My daughter, Anri, the day she made a crown of dandelions.
My daughter, Anri, the day she made a crown of dandelions.

My favorite cat, Basil.

Awww. Our sweet Ginger back when she was an adorable puppy.

My daughter, Isla, in a kimono. I highlighted the flower in hair.

Kenji and me on our wedding day. Hmmm. I wonder what we were gazing at.

I can't wait to get these on the wall!


Comments