Retro Felt Ornaments
What? One week until Christmas? How did that happen? I've been so busy making cute ornaments, that I kind of ignored some bigger handmade projects. I'd better get right on that knit infinity scarf before the holidays pass me by.
But back to cute handmade ornaments...
But back to cute handmade ornaments...

I love a little retro style now and then. When I think retro Christmas, I think fancy cocktails. Esquivel playing in the background. Ladies dressed like Jackie O. And these ornaments!
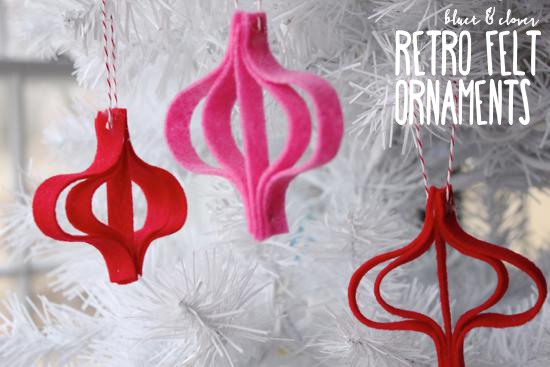
I put my own spin on these classic shapes by using felt.

Start out by cutting half-inch-wide strips of felt with a rotary cutter and cutting mat or fabric scissors.
You'll need two 5-inch-long strips, two 4-inch-long strips and one 3-inch-long strip.

Now start layering the strips so that the tips are all flush at one end. I did this tutorial using 3 different colors to make it easier to follow.
Place a 5-inch strip on the bottom and then a 4-inch strip on top of it. Next comes the 3-ich strip, then the other 4-inch and finally the other 5-inch strip.


Here's a side view of the layered strips, below.

Now hold the flush end with one hand and pinch the opposite end of the longest strips together. Push those two long strips towards the 4-inch strips and then keep pushing until you've got all ends of the felt strips flush.


Mine are stitched together at the top and bottom, but you can easily hot glue the layers together. You could also use a drop of fabric glue in between the layers and hold them together with clothespins while they dry for a kid-friendly project.
The last step is to attach a bit of twine or string to the top so you can hang them from the tree.
Happy retro holidays!


Comments