How To Paint A Sign
Today was a teacher's work day at school, so the kids helped me add a little Halloween humor to our front door.
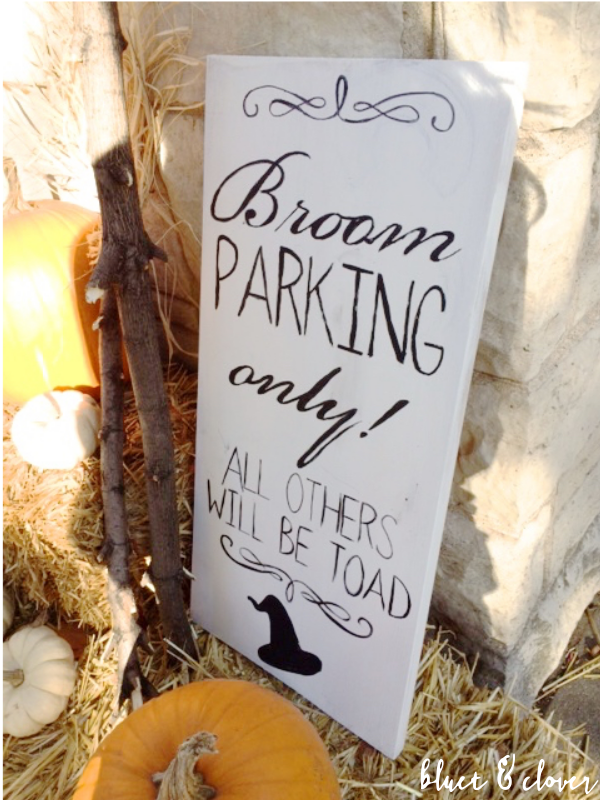
I've been seeing all sorts of cute Halloween signs at the shops, including some similar to the one I painted today, but nothing really screamed "BUY ME!"

So I found a piece of pine board in the basement. I'd cut this to make some shelves for the craft room and ended up with an extra. It was the perfect size for my broom parking sign.
After sanding the board, I gave it a quick couple of coats with white latex paint.
While it was drying, I started playing around with some fonts on my computer. Make sure you measure your board so you know how big to make the letters. My board was about 12"x20". The fonts I used were Bickham Script Pro in 385 pt and PenelopeAnne at 288/173pt.
When you have everything typed out and sized correctly, you'll need to flip text horizontally before you print.

Next, I cut out the text and placed it facedown on the board, arranging it so that it looked balanced. I added some scrolls and a witch hat design, too. You can see how it's easy to see the text right through the back of the paper. Once you think things are looking in place, tape down the paper to the board with painter's tape.

Then take a coin and rub the back of the paper to transfer the ink to the board. You can pull up the paper to check and see if the transfer is working. Just be sure to keep one hand down on the paper so it doesn't move.
If you're having trouble making the transfer, you may have to trace the letters in pencil first. This has never been the case for me and I've used this method several times to make signs. It's so simple, quick and inexpensive!

Remove the paper and start going over the letters with a Sharpie or paint. I did the very narrow letters with a Sharpie and used black acrylic paint and paintbrush to do the thicker letters. I really enjoy painting, so I didn't mind the extra time that it took. There's something soothing about moving a paintbrush back and forth.
A Sharpie is probably more precise if you're not an expert at painting, but the wood really soaks up that ink. You may find your marker running dry before you're finished. If this happens, try scribbling on scrap paper with your Sharpie and waiting a couple of minutes before you continue writing.

I used the world's worst brush for this project. I think this was from my kids' cheap watercolor set. I highly recommend using a quality pointed round or round detail brush for this kind of thing.

When dry, apply a coat of clear outdoor sealer if you're going to be using your sign outdoors. And that's it! Making your own signs is so much fun and you'll save money, too. What's not to love?
One other project the kids and I worked on today was making the witches' brooms to go next to the sign.

We found a nice sized fallen branch to work as the handle (actually 2 handles after I sawed it in half).
Then we went around the yard collecting twigs. I also got out my pruner, cut back some perennials and added the stems to the twigs. Then I arranged the twig/stem collection around the end of the branch. I used a little hot glue to hold things in place until I wrapped some twine around the bristles.
I got tired off picking up twigs and used some rafia for the bristles of the second broom.
I got tired off picking up twigs and used some rafia for the bristles of the second broom.

So now we have a couple of props by our broom parking sign. Hopefully, that will catch the attention of some real witches!


Comments